
I originally completed this project in 2015 and it is still in use 7 years later as my dresser! This DIY white dresser was my first time painting furniture white but the before and after shows it can be done by a beginner.

- Black & Decker Electric Hand Sander
- Zinsser Bulls Eye 1-2-3 Primer
- Rust-Oleum Wood Stain in Kona
- HGTV Home Paint by Sherwin Williams
- Paintbrushes
Finding A Cheap Dresser Needing TLC
When I moved into my new apartment I decided to take on a project for my room. I needed a dresser for a while and it seemed like the perfect project to make it feel like home.
Is started browsing sites for white dressers and quickly realized they were all out of my price range. Nice furniture did not fit in my budget at the time as I was still in debt and just starting over financially.
I couldn’t afford the dressers I liked so I bought the dresser above for $75 off a Facebook resale site.
Then I Googled and Pinterested my way through a DIY painted white dresser makeover!

DIY White Dresser Step By Step
Below are the step by step actions taken to paint this wood furniture white and have it look decent.
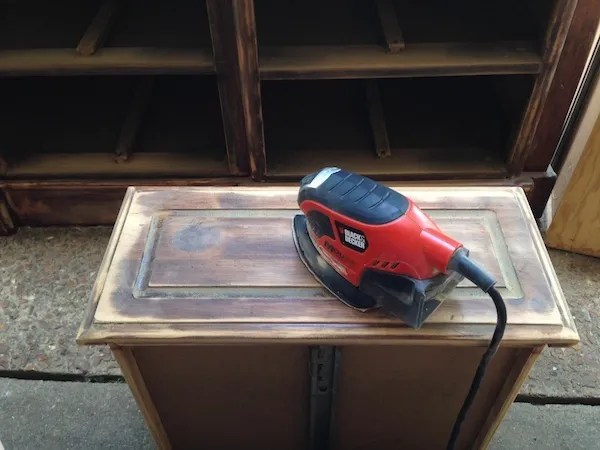
Furniture Stripping
The first step was taking it all apart and stripping the top of the varnish with an electric hand sander.

I’m incredibly grateful for my partner’s help on this part of the project. It was an area I was unfamiliar with and didn't know if I was doing it properly.
Stripping the top of the dresser was really hard work and he handled it like a pro!

I then took over the sanding duties and sanded all the drawers and the rest of the dresser.
Since this part didn’t need to be perfect or fully stripped I could handle it without assistance. It took several hours to go across the whole dresser.
Furniture Priming
After sanding, I purchased the primer for the next step.
I bought Zinsser Bulls Eye 1-2-3 Primer since it came highly recommended on several sites.
This was the #1 option on Amazon with thousands of reviews. I trust the internet to get my through DIY projects!

The priming process began and took a good chunk of time to go over everything.
I only applied one coat here since I knew I’d be applying several paint coats.

After the primer was applied the dresser looked a bit like this.
This was the point where people finally started to get my vision of a contrasting top to the dresser, even if the colors were not right.

As you can see, my workspace in the garage was makeshift and ever shifting. It depended on the day as to what space I could use and where I could spread out, but I’m so grateful Jason’s family let me take over their garage on the weekends for this project!

Wood Staining
After priming I took a trip to Lowe’s to scope out wood stains for the top of the dresser.
I had narrowed it down to these three and ultimately chose Rust-Oleum Wood Stain in Kona because it was the darkest stain where you could still see the wood grain well.

I applied a couple coats of the stain but you could immediately see the difference after one coat.
It didn’t take well in a few places which is why I went over it again.

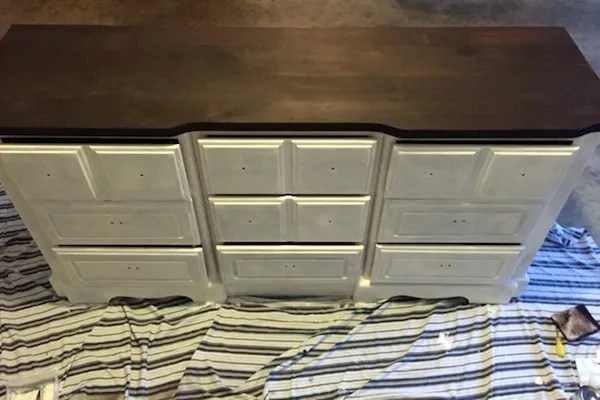
After the stain dried the dresser looked a bit like this with the contrast between light and dark really coming alive!
My vision was to have a dark wood top with a white dresser and this showed how great it would look once I was finished.
Painting Furniture White
Then began the coats of paint. Since I was starting with wood I knew painting the furniture white would take a few coats.
I used the HGTV Home Paint by Sherwin Williams that I picked up along with the stain on one of my many home improvement store trips. I also bought brushes and paint roller supplies.

The painting lasted forever, or at least that is what it felt like. Because I was painting wood furniture white, I felt like it needed multiple coats until I achieved that solid white look.
It took hours to do a single coat so I could only do one coat at a time and then let it dry for several days outside in a garage in the crazy Memphis summer heat.

Adding Drawer Pulls
After several coats of white paint I set out on the impossible task to find new drawer pulls.
The original dresser pulls were an unusual size so it was hard to find pulls to fit that size, let alone pulls I liked and could afford. I finally gave up and decided to drill new holes and buy pulls that would cover the holes. Sure, it’s not a perfect fix but it works for now, for use in my home.
It’s also a lesson learned – measure and make sure you’re not buying something with crazy measurements that will make it hard to find parts!
I liked the contrast of the dark drawer pulls I finally chose to use. The copper edges gave it just enough interest without being distracting.
DIY White Dresser Before And After

Despite the problems I encountered I really love the results of this dresser makeover project!
The finished product fit perfectly in front of a large window in my bedroom and gave me the storage space I really needed.


As you can tell, it looks different depending on what time of day it is and wether or not the lights are on in the room.
I wanted to share photos during the day and at night so you can see the difference.
Below is the result of painting furniture white. You can see from the before and after that the white paint gives it an entirely new look!
This DIY white dresser has been in use daily for the last 7 years and it still looks just as good!
This was one of my most successful DIY projects and I'm glad I researched which products to use for the process. Overall I spent much less than any of the fully finished options I originally found. This was a huge DIY and financial win project wise!